upload big movie from imovie to youtube 2017
iMovie is a versatile video editing app bachelor on Macs, iPads, and iPhones. All-time of all – it's free!
Once you're done editing your masterpiece, you're going to desire to share it with the world – and by 'globe' that most probable means YouTube.
In this article we'll embrace how to export from iMovie to YouTube on the iOS app, and how to share your project from the Mac app and upload to YouTube.
We'll make sure your settings are set to the highest quality, tell you lot how to figure out upload fourth dimension, and assistance you troubleshoot should you become whatsoever errors.
Ready to learn how to get from iMovie to YouTube? Read on.
How to Upload to YouTube from iMovie on Your Mac
Before you get through these steps, make sure you have a YouTube account and your version of iMovie is upwardly to engagement.
In previous versions of iMovie you used to be able to connect your YouTube business relationship and upload straight. Withal the latest version did away with the connectedness (you lot can still do it in Final Cutting Pro). And then you need to export your video every bit a pic file and upload the file to YouTube.
Accept Our iMovie Course for Free In less than 60 minutes you lot'll be an iMovie pro
Stride one – Export Moving picture from iMovie to Your Estimator
Quickest iMovie Settings

Click the Share button
Click the Share icon in the elevation right, or become to File -> Share.
Select YouTube & Facebook
Enter file info
In the popular-up window, y'all tin can enter a title, clarification, and tags. Don't worry about this too much – you'll edit this on YouTube after.
Select video resolution
Under Resolution choose the highest quality bachelor – unremarkably HD 1080p or 4K. The options you lot see will depend on your project's resolution.
Cull where to salve the file
Click next and choose where you want to relieve your file.
Export movie
Click Relieve and your picture volition export.
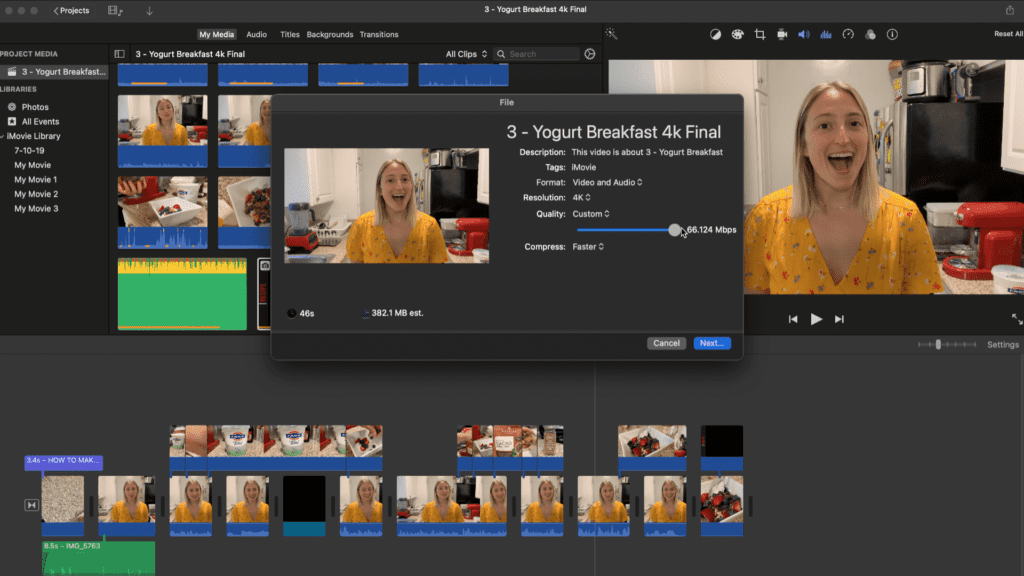
Highest Quality iMovie Settings
- Click on the Share button in the superlative right or go to File – Share.
- Click on Export File (if you want to export simply a still for creating a thumbnail, choose Salvage Current Frame).
- In the pop-up window, you can enter a title, clarification, and tags.
- In Resolution cull the highest quality – normally Hard disk 1080p or 4K. The options you see will depend on your project's resolution.
- At present we have additional options for Quality. The absolute highest quality video codec volition exist ProRes. Notwithstanding, if your source material wasn't shot with something with a high bitrate, exporting to ProRes won't magically brand your footage better.
The all-time option is to choose Custom and drag the slider all the way to the right (66 Mbps in our example).
- Under Compress, alter the option to Better Quality.
- Click next and choose where you desire to save your file.
- Click Save and your movie will export.
Step 2 – Upload to YouTube
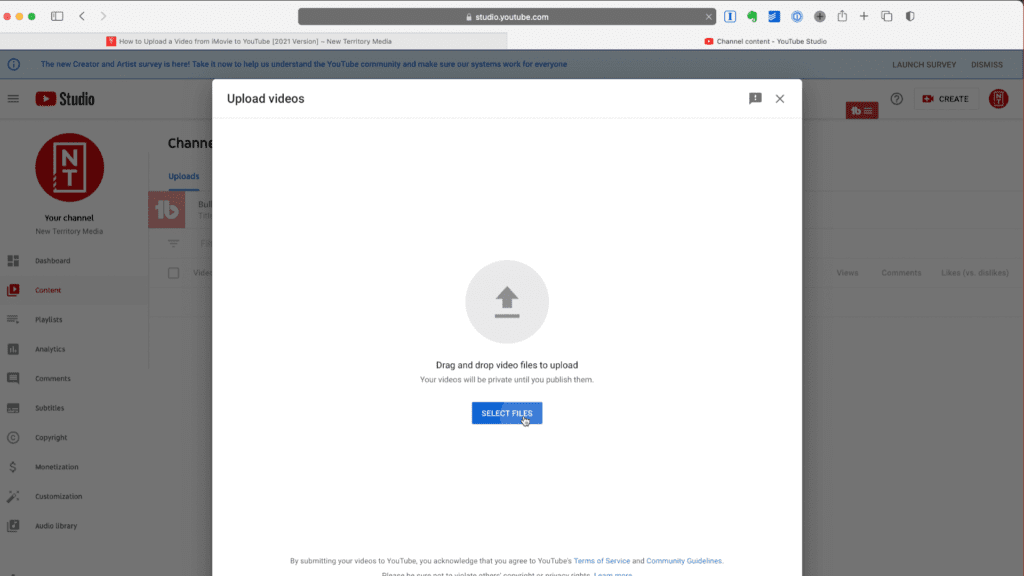
- Become to YouTube Studio
- Click on Create, then Upload Video
- Click Select File and notice the file y'all just exported from iMovie
- Click Next to kickoff uploading your file
Stride three – Edit Your YouTube Video's Metadata

- While your video is uploading you tin can gear up its metadata. Add a title and description.
- Once the video uploads, you'll exist able to choose a frame for the thumbnail or preferably upload your ain custom thumbnail.
- Scrolling down you'll exist able to add together your video to any Playlists you may desire.
- You'll also see the option to mark if your video is made for kids. While your video may be appropriate for kids, unless it was specifically made with kids beingness the target audience, you lot want to select No, it's non fabricated for kids.
- If you lot click Show More yous'll exist able to add more info like tags and location.
- On the next page, you can plow on Monetization for your video (if your account is eligible).
- On the next page, you can add an End Screen and Cards to your video.
- The adjacent page will check your video for whatever copyright flags.
- And the terminal folio is where you set the visibility. If you lot're ready to go set the status to Public. If you want your video to be feasible by only people with the link, prepare information technology to Unlisted. If y'all don't want anyone to see your video, fix it to Private. Y'all can also Schedule a specific time for your video launch and you can set the video as a Premiere.
- That's it! Your video is ready to become.
How to Upload to YouTube from the iMovie App on Your iPhone
If y'all're using your iMovie on your telephone, don't worry! It is at present possible to upload to youtube from the iMovie App on your iPhone. Bank check out these simple instructions you can follow. Take notation that you can but practise this for versions of iMovie 2.3.2 or later.
Step i. Click Share.
- Open up the iMovie app and go to Projects Browser. Hither, you lot tin pick which project yous want to share.
- Tap the Share button indicated by the icon with a box and an arrow pointing upward.
- Click on Options at the meridian of your screen. You lot can change the project attribute ratio, orientation, and any other avant-garde options.
- Select Done to apply the new settings.
Step 2. Salve Video
Click on Save Video to have the file downloaded to your Photos library. For those with iCloud enabled, the video tin likewise be accessed on your drive using other Apple devices.
Stride two. Upload your Video on Youtube
- Become to the YouTube app on your phone (or computer if you lot transferred the file).
- Click the + icon on the bottom, then Upload a Video.
- Tweak your description, title, thumbnail, etc. Click publish, and you're washed!
Annotation: YouTube will not allow you to upload videos longer than fifteen minutes if your account has non been verified.
Accept Our iMovie Course for Complimentary In less than 60 minutes yous'll be an iMovie pro
How Long Does it Accept for iMovie to Upload to YouTube?
To give you lot an thought, a 3 GB-size video upload from iMovie will accept you lot 1 hour with good internet speed. 200 MB volition only have you 5 minutes. Upload time varies from a few minutes to possibly several hours because of the video quality settings, your video's file size, and your internet upload speeds. Note that simply considering you have a fast download speed doesn't mean you'll have a fast upload speed. Apply a speed tester like Fast.com to find out your upload speed.
How to Make YouTube Uploads Go Faster
Quality Settings
For faster uploads, follow these settings.
- YouTube recommends uploading your videos in MP4.
- If your video resolution is set at 4K, change it to 1080p.
- Avoid ProRes. MP4 files are expert enough.
Length of Movie
The shorter the video length, the smaller the file size. Cut down on any dead air moments and long intros and outros. Stick to the meat of your content and so that you lot'll successfully get shorter but valuable videos for your subscribers to enjoy.
Internet Upload Speeds
Try these tips to go a faster internet connection.
- Switch to ethernet cables and connect your device directly to your router.
- Plow off any unused devices connected to your wifi.
- Avoid doing anything else on your device to avoid jamming the internet connection.
What to Do if iMovie Won't Upload to YouTube
What if iMovie failed to export and upload to YouTube? Worry not! Here are the most common iMovie issues and how to resolve them.
"My iMovie export failed"
Attempt to check if you have:
- Plenty complimentary space in your Mac's hard disc.
- No errors on your timeline or glitchy video
- Try exporting in a different resolution
"My iMovie is slow"
Well-nigh likely, iMovie is being used with other programs competing with memory utilize. Try quitting all applications and using a program like CleanMyMac to clear out memory and storage space.
If you've tried closing all applications and it is withal wearisome, near probable your equipment cannot support iMovie.
"The trailer of my videos isn't showing correctly"
Use the "Fonts" app that will activate all fonts. After y'all've logged in, iMovie volition restart. You'll have to become to the "disk utility" button and click on "repair permission" and "restart OSX."
"My video has distorted segments."
Recheck your video in iMovie, where the distortion begins. If you encounter it, try editing information technology out before uploading it to YouTube.
"My iMovie keeps crashing"
Try these simple steps to keep iMovie from crashing:
- Articulate cache binder. Become to your iMovie awarding and click on Preferences. Tap "delete render files and ostend deletion. It volition exist a huge assistance especially if you have an upcoming project that requires a lot of space.
- Empty the preference folder or delete your preference file from iMovie. Its file name is com. apple.iMovie app.plist. Yous can discover this in the user binder labeled every bit "Library/Preferences."
- Shut the iMovie Application and find the .plist file of your iMovie to the arrangement desktop. Try to open it again and see if there are any changes.
- Reinstall the iMovie awarding or update it to the current version.
Take Our iMovie Course for Free In less than 60 minutes you'll be an iMovie pro
Source: https://newterritory.media/imovie-to-youtube/
Post a Comment for "upload big movie from imovie to youtube 2017"